|
3DSMax BHD Scene Setup Tutorial by A.Bullet
|
|
DOWNLOAD: bhd_blank_scene.zip
|
|
Objective: The objective of this tutorial is to show the user how to properly setup your 3DSMax scene to work on models to be used as objects in mods for the game 'Delta Force Black Hawk Down' |
|
|
|
|
 |
|
Step 1:
Open 3DSMax, then look at your 3DSMax interface and compare it to the screenshot above.
This is the 'default' layout, and will be used throughout the course of this tutorial. Please
take a moment at this point to verify your 3DSMax is laid out the same way. If its not then
pay particular attention to the next several steps.. and verify your settings match the ones in
the screenshots. |
|
|
|
|
|
|
|
|
 |
|
Step 2:
The screenshot above shows the 'Show UI' sub menu of the 'Customize' menu. This screenshot is provided to help you verify that your 3DSMax setup is displaying the proper UI elements before you proceed to the next step. Please take a minute to verify that your 3DSMax is showing the same UI elements now, if it isnt, then make the nescessary changes to make your 'Show UI' submenu match the one shown in the screenshot. |
|
|
|
|
|
|
|
|
 |
|
Step 3:
The next step, is to continue on and setup the 'Units' we will be using when creating BHD objects in 3DSMax. From the 'Customize' menu, choose 'Units Setup' as shown above. |
|
|
|
|
|
|
|
|
 |
|
Step 4:
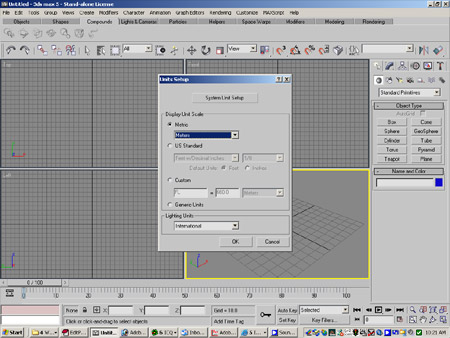
In the last step you chose 'units setup' from the customize menu, this should have popped up the dialog box which is shown in the screenshot above. This dialog will allow us to setup several key parts of our 3DSMax scene. Its important to setup 'units' correctly so we can maintain proper scale of objects when moving back and forth between 3DSMax and Novalogic's Object Editor. The next thing for you to do, is to click the 'System Unit Setup' button which is located at the top of this dialog window. |
|
|
|
|
|
|
|
|
 |
|
Step 5:
When you clicked the 'System Unit Setup' button in the previous step, the dialog window shown above should have popped up. In the dropdown where it says 'inches' above, it needs to be changed to 'meters' as shown in the next screenshot. |
|
|
|
|
|
|
|
|
 |
|
Step 6:
The screenshot above shows the dropdown changed to 'Meters' as it should be. Make sure to set this setting to 'Meters' on your system, and then hit 'OK'. This will close the 'System Unit Setup' dialog and bring you back to the 'Units Setup' dialog. |
|
|
|
|
|
|
|
|
 |
|
Step 7:
Now that we are back in the 'Units Setup' dialog, we are still not done, next we need to make a couple of changes in this window, before we proceed. First click the 'metric' radio button, then, choose 'meters' from the dropdown as shown in the screenshot above. Then hit OK. |
|
|
|
|
|
|
|
|
 |
|
Step 8:
Now, unit setup should be complete and we have 3DSMax 'thinking' in Meters, so we can know our units in 3DSMax will be equivelent to the units in the OED. Next we need to modify the grids that 3DSMax uses, this will allow us to use the grids more effectively as a construction tool. Additionally, it will help 'Snap' to function in a manner which will be more helpful to us. The next thing to do to accomplish this, is to choose the 'Grid and Snap Settings' menu option from the 'Customize' menu. |
|
|
|
|
|
|
|
|
 |
|
Step 9:
Clicking the 'Grid and Snap Setup' button in the last step should have brought up the dialog box shown in the screenshot above. Change the value in the 'Grid Spacing' box to .25M |
|
|
|
|
|
|
|
|
 |
|
Step 10:
Now, change the 'Major Lines every nth Line' setting to 4, this will give us lines every 1M, finally once thats complete, close the dialog. Now Use the menu option 'Save As' from the file menu to save this scene as 'bhd_blank_scene.max', now you can use this scene as a 'template' whenever you start working on a new file. This way your workspace will always be setup properly, and you should be able to easily maintain scale between 3DSMax and NovaLogic's OED. |
|
|